
I did this today. It took bloody ages! The actual wiring is a cinch, but deciding where to mount the phono socket and figuring out how to thread the wire through to make subsequent console opening operations easier took up most of the day.
THE MOD:
Adding a phono socket to the 360 to allow coaxial connection to my 5.1 system
THE REASON:
Cos my DVD player uses optical only and I don't want to faff around unplugging optical cables, thank you very much. This way I can have my 360 and DVD player connected to the same system simultaneously.
THE PRICE:
About ?2 altogether for the parts from Maplin (www.maplin.co.uk). And voiding your warranty
THE BITS:
A) Phono Socket (Maplin Code: YW06G)
B) PCB Header (Maplin Code: RK65V)
C) Two-way Socket Housing (Maplin Code: HB59P)
D) Metal PCB Terminals (Maplin Code: YW25C)
E-Z) Soldering Iron, Torx Screwdrivers, etc
THE PROCEDURE:
Open your XBox 360 as per your favourite XBox 360 opening guide
Remove the motherboard and flip it over, then have a good look at the little collection of pins where the AV port is. The pins you are after are pin 25 and 27. Pin 27 will be labelled. Pin 25 is above Pin 27. The way the pins are numbered is a little awkward to say the least - look at Pins 1,2,3 and 4 to get into the rythm of the numbering pattern and then locate and mark the pins you need. A picture is worth a thousand words, of course, but I didn't take the first picture until much later so sorry about that.
Pin 25 is the data pin
Pin 27 is the ground pin
Solder a length of wire to each pin. The length of these wires is up to you - I made mine about 10cm each.
Mark the wire that goes to Pin 25 - this will be soldered to the centre of your phono socket (Pin 27 will be soldered to the outside of the socket as it is ground)
================================================== ====
THE FOLLOWING SECTION IS ONLY NECESSARY TO MAKE FUTURE FIDDLING EASIER
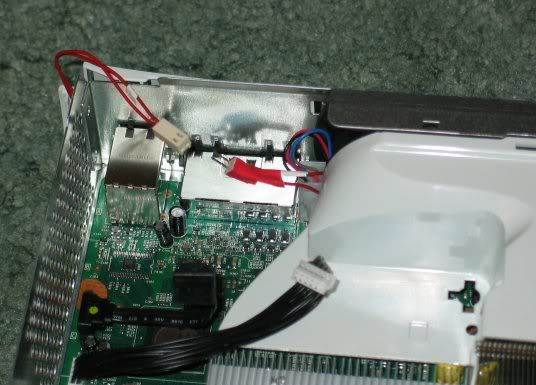
Solder the two wires to the PCB Header (B) and prepare two more wires (make these long - about 20cm each).
* Make sure you remember which wire is soldered to Pin 25! *
The Metal PCB Terminals (D) slot into the Socket Housing (C). Before you do that, crimp each newly-prepared wire to a terminal using pliers or similar, checking to make sure the wires are firmly in place.
Insert each terminal into the housing. Now, whenever you want to open your XBox 360, you need only separate these two connectors and remove the rest of the metal casing.
================================================== ====
Now for the fun bit, deciding where the phono connector should go. The place I chose, next to the ethernet port, is good because it doesn't get in the way of anything else. I was going to put the phono where the serial number is but that would hinder the connection of the wireless adapter if I bought that in the future.
To prepare for this, I drilled a big 10mm hole in the top part of the metal casing (I removed the metal casing from the plastic outer bit first):

Here is a pic of the installed socket:
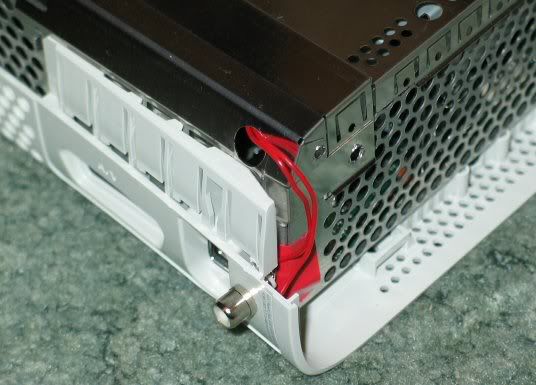
And that's about it. Solder the Pin 25 wire to the centre of the phono socket, and the other wire to the outside bit. Drill a hole for it, screw it in and tighten it. The socket will be very close to the metal casing so try bending the contact a bit, and use some insulating tape on the casing itself to avoid any short-circuiting.
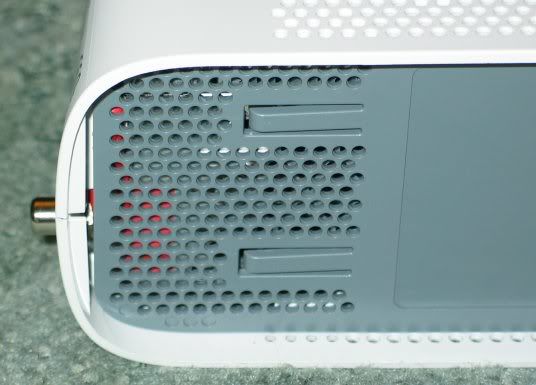
Close up the 360 and check to see if the socket is pushing out on any bits of plastic. It should be clear of the grey side panel as this is where the HDD goes:
Turn the XBox 360 around 90 degrees to admire your work:
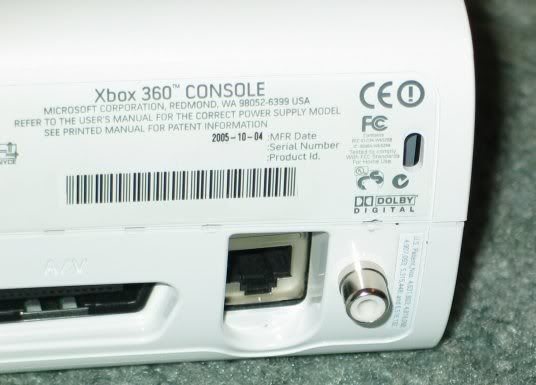
All done! Enjoy your digital sound through cheap-ass phono cables instead of that rip-off optical stuff.
THE MOD:
Adding a phono socket to the 360 to allow coaxial connection to my 5.1 system
THE REASON:
Cos my DVD player uses optical only and I don't want to faff around unplugging optical cables, thank you very much. This way I can have my 360 and DVD player connected to the same system simultaneously.
THE PRICE:
About ?2 altogether for the parts from Maplin (www.maplin.co.uk). And voiding your warranty
THE BITS:
A) Phono Socket (Maplin Code: YW06G)
B) PCB Header (Maplin Code: RK65V)
C) Two-way Socket Housing (Maplin Code: HB59P)
D) Metal PCB Terminals (Maplin Code: YW25C)
E-Z) Soldering Iron, Torx Screwdrivers, etc
THE PROCEDURE:
Open your XBox 360 as per your favourite XBox 360 opening guide
Remove the motherboard and flip it over, then have a good look at the little collection of pins where the AV port is. The pins you are after are pin 25 and 27. Pin 27 will be labelled. Pin 25 is above Pin 27. The way the pins are numbered is a little awkward to say the least - look at Pins 1,2,3 and 4 to get into the rythm of the numbering pattern and then locate and mark the pins you need. A picture is worth a thousand words, of course, but I didn't take the first picture until much later so sorry about that.
Pin 25 is the data pin
Pin 27 is the ground pin
Solder a length of wire to each pin. The length of these wires is up to you - I made mine about 10cm each.
Mark the wire that goes to Pin 25 - this will be soldered to the centre of your phono socket (Pin 27 will be soldered to the outside of the socket as it is ground)
================================================== ====
THE FOLLOWING SECTION IS ONLY NECESSARY TO MAKE FUTURE FIDDLING EASIER
Solder the two wires to the PCB Header (B) and prepare two more wires (make these long - about 20cm each).
* Make sure you remember which wire is soldered to Pin 25! *
The Metal PCB Terminals (D) slot into the Socket Housing (C). Before you do that, crimp each newly-prepared wire to a terminal using pliers or similar, checking to make sure the wires are firmly in place.
Insert each terminal into the housing. Now, whenever you want to open your XBox 360, you need only separate these two connectors and remove the rest of the metal casing.
================================================== ====
Now for the fun bit, deciding where the phono connector should go. The place I chose, next to the ethernet port, is good because it doesn't get in the way of anything else. I was going to put the phono where the serial number is but that would hinder the connection of the wireless adapter if I bought that in the future.
To prepare for this, I drilled a big 10mm hole in the top part of the metal casing (I removed the metal casing from the plastic outer bit first):
Here is a pic of the installed socket:
And that's about it. Solder the Pin 25 wire to the centre of the phono socket, and the other wire to the outside bit. Drill a hole for it, screw it in and tighten it. The socket will be very close to the metal casing so try bending the contact a bit, and use some insulating tape on the casing itself to avoid any short-circuiting.
Close up the 360 and check to see if the socket is pushing out on any bits of plastic. It should be clear of the grey side panel as this is where the HDD goes:
Turn the XBox 360 around 90 degrees to admire your work:
All done! Enjoy your digital sound through cheap-ass phono cables instead of that rip-off optical stuff.


Comment