
Recently with the price of some games being really silly I’ve been making repoduction versions. I’ve also been making repro games for titles that never got a Japanese release such as Calibur 50.
Below is my guide on how to make reproduction Mega Drive games. Note, these are not intended to be sold as original fakes. They are intended to be for my personal collection.
Stuff you will need
Printing paper. - For the covers I like to use Epson Super Fine grade paper. It’s got a nice thickness to it and is good enough for high quality prints .
Sticker labels - I use a gloss super fine sticker sheet that I buy from the 100 yen store (3 A4 size sheets per pack). These are very powerful so you don’t want to make a mistake when applying them. On the plus side they’ll never peel off either.

Glue remover – I use a product called De-Solv-It. The main base is orange but man, this stuff is amazing. It can remove the most stubborn of sticky glue and even marker pen from cartridges!

Game PCBs – I order my game PCBs from a dealer in China. Buying just the PCBs is great as the prices are cheap. I could pay a little more and get them in a cartridge cases however the quality of Chinese plastic is bloody awful.

Step 1
Get yourself a load of cheap games. I bought this box of 20 odd titles for the price of two days lunch (about 1700 yen). It may seem wrong to throw away the covers and manuals but these are very common and in a few cases pretty crappy games anyway. Think of them as the Japanese versions of Electronic Arts sports crap.

Step 2
Gut the cartridges and soak in water for a hour then peel off the main sticker. The main sticker is very easy to remove in one go but leaves the white backing on the cartridge. This is where our De-Solv-It comes in. Put all the cartridge case shells in to a bowl and spray them with a generous amount of De-Solv-It and leave overnight.

Step 3
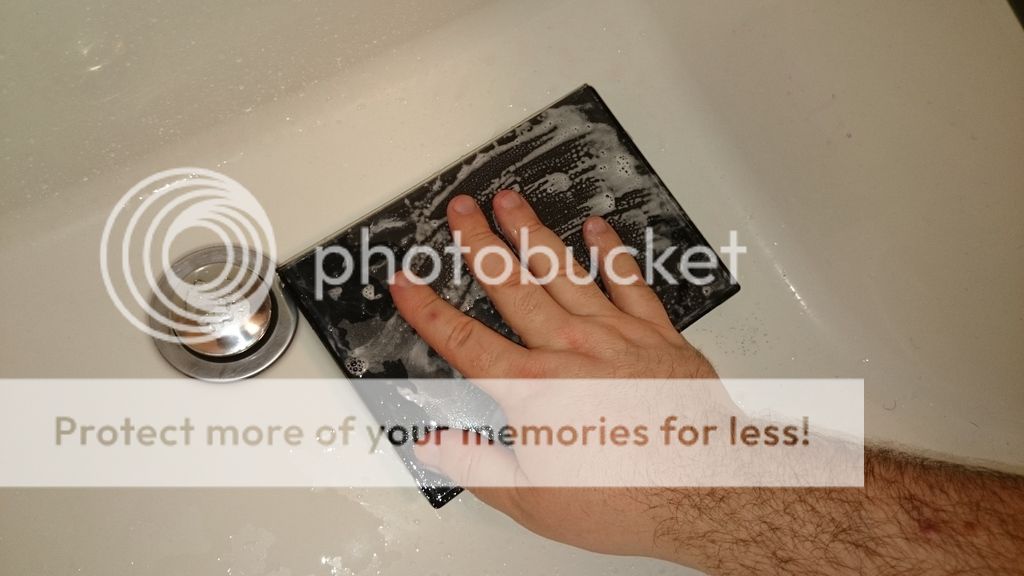
Take all the soaked cartridge cases out of the bowl and place in to the kitchen sink or something similar. Start to rub the soaked cartridge white areas with your finger. You’ll see the white paper easily rub away along with all its nasty backing glue. You may need to add a little more De-Solv-It to remove any stubborn glue.


Step 4
Once all the glue and paper has been removed, rinse the cartridge shells in warm water. Place them in a bowl and leave to dry for a day. Or if you are in a hurry you could dry them off with a towel.


Step 5
Design your covers and case labels. I do all of mine on Photo Shop. None of the covers in this feature are simple cover scans printed out. They are made from various sources in an attempt to recreate the original or an all new design. For example, the Ristar cover and cartridge case are all built from scratch and look like the original until you take a closer look. The Ristar character poses of on the cartridge label are actually different than the official game.

Step 6
Place your PCB in to the now dry and super clean cartridge shell. Screw it back together and place on the sticker. Remember that the chip or epoxy should be facing the front of the cartridge. You don’t want to put the PCB in backwards!

Step 7
This is actually optional but I think if you are going to the trouble of making good looking reproduction cartridges then you should also put them in to clean cases. You’ll be surprised at just how dirty these cases can be even when they look clean. I give each case a wash using normal hand soap. Rinse well and leave to dry. It’s also a good idea to insert a normal tissue in to the case to absorb any water that may be along the sides of the case were the plastic cover is attached to the case.
Step 8
Stand back and admire your handy work.


I’d say that the case cover and cartridge label design stage are the most time consuming. You could just look for scans on the net but in most cases they are either too low in resolution or look total crap thanks to poor jpeg compression. This is why I built my own from various sources. The end results are much better.
EDIT
All new section added - Super Famicom cartridges
So the first few steps are the same as the Mega Drive when it comes to preparing the cartridge shells as is the actual printing of the labels. What you have to be careful of is that unlike Mega Drive cartridges, the chips on Super Famicom games face the back, not the front as you can see below.

There are two ways to make a Super Famicom game box. First way is to use an excising box and attach your printed label to it. The second and more time consuming way would be to make your own box. I'm going to show you the latter.
First print your cover on to sticky gloss paper and attach it to some 2mm card.

Once cut out attach double-sided tape to the joint areas.

Stick the front and back cut outs together. Make sure you don't do them upside down!

Simply score the back of the card where the flaps should bend and fold.
There you have it. One reproduction of Magical Pop'n that craps all over those ones you can buy on the net with their ugly US cartridges and deformed artwork because they've stretched it out of shape.

Just in case you are wondering, the cover I used wasn't a scan of an original but hand built from various images.

Below is my guide on how to make reproduction Mega Drive games. Note, these are not intended to be sold as original fakes. They are intended to be for my personal collection.
Stuff you will need
Printing paper. - For the covers I like to use Epson Super Fine grade paper. It’s got a nice thickness to it and is good enough for high quality prints .
Sticker labels - I use a gloss super fine sticker sheet that I buy from the 100 yen store (3 A4 size sheets per pack). These are very powerful so you don’t want to make a mistake when applying them. On the plus side they’ll never peel off either.
Glue remover – I use a product called De-Solv-It. The main base is orange but man, this stuff is amazing. It can remove the most stubborn of sticky glue and even marker pen from cartridges!
Game PCBs – I order my game PCBs from a dealer in China. Buying just the PCBs is great as the prices are cheap. I could pay a little more and get them in a cartridge cases however the quality of Chinese plastic is bloody awful.
Step 1
Get yourself a load of cheap games. I bought this box of 20 odd titles for the price of two days lunch (about 1700 yen). It may seem wrong to throw away the covers and manuals but these are very common and in a few cases pretty crappy games anyway. Think of them as the Japanese versions of Electronic Arts sports crap.
Step 2
Gut the cartridges and soak in water for a hour then peel off the main sticker. The main sticker is very easy to remove in one go but leaves the white backing on the cartridge. This is where our De-Solv-It comes in. Put all the cartridge case shells in to a bowl and spray them with a generous amount of De-Solv-It and leave overnight.
Step 3
Take all the soaked cartridge cases out of the bowl and place in to the kitchen sink or something similar. Start to rub the soaked cartridge white areas with your finger. You’ll see the white paper easily rub away along with all its nasty backing glue. You may need to add a little more De-Solv-It to remove any stubborn glue.
Step 4
Once all the glue and paper has been removed, rinse the cartridge shells in warm water. Place them in a bowl and leave to dry for a day. Or if you are in a hurry you could dry them off with a towel.
Step 5
Design your covers and case labels. I do all of mine on Photo Shop. None of the covers in this feature are simple cover scans printed out. They are made from various sources in an attempt to recreate the original or an all new design. For example, the Ristar cover and cartridge case are all built from scratch and look like the original until you take a closer look. The Ristar character poses of on the cartridge label are actually different than the official game.
Step 6
Place your PCB in to the now dry and super clean cartridge shell. Screw it back together and place on the sticker. Remember that the chip or epoxy should be facing the front of the cartridge. You don’t want to put the PCB in backwards!
Step 7
This is actually optional but I think if you are going to the trouble of making good looking reproduction cartridges then you should also put them in to clean cases. You’ll be surprised at just how dirty these cases can be even when they look clean. I give each case a wash using normal hand soap. Rinse well and leave to dry. It’s also a good idea to insert a normal tissue in to the case to absorb any water that may be along the sides of the case were the plastic cover is attached to the case.
Step 8
Stand back and admire your handy work.
I’d say that the case cover and cartridge label design stage are the most time consuming. You could just look for scans on the net but in most cases they are either too low in resolution or look total crap thanks to poor jpeg compression. This is why I built my own from various sources. The end results are much better.
EDIT
All new section added - Super Famicom cartridges
So the first few steps are the same as the Mega Drive when it comes to preparing the cartridge shells as is the actual printing of the labels. What you have to be careful of is that unlike Mega Drive cartridges, the chips on Super Famicom games face the back, not the front as you can see below.
There are two ways to make a Super Famicom game box. First way is to use an excising box and attach your printed label to it. The second and more time consuming way would be to make your own box. I'm going to show you the latter.
First print your cover on to sticky gloss paper and attach it to some 2mm card.
Once cut out attach double-sided tape to the joint areas.
Stick the front and back cut outs together. Make sure you don't do them upside down!
Simply score the back of the card where the flaps should bend and fold.
There you have it. One reproduction of Magical Pop'n that craps all over those ones you can buy on the net with their ugly US cartridges and deformed artwork because they've stretched it out of shape.
Just in case you are wondering, the cover I used wasn't a scan of an original but hand built from various images.


Comment